Hosepipe ban - watering plants

In this part of Bedfordshire, we have escaped the hosepipe ban so far, but it is still early in the year.

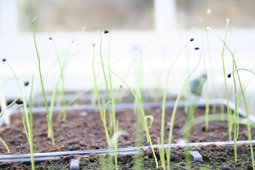
But we are lucky that the Victorians were so resourceful, as our lovely old greenhouse and vinery has a large reservoir built underneath to catch all the rainwater from the glass roofs, and safely stored until we need it. It is much better for the plants, rather than using the local hard water and as it is pumped up to a smaller tank in the greenhouse, the ambient temperature is raised too, so it is far less of a shock to delicate seedlings when they are watered using a fine spry with the watering can.

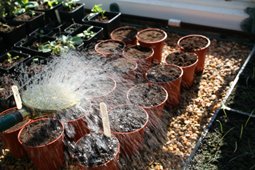
Speaking of which...we use Haws metal watering cans, they are such a good, long lasting design, and the only part we have replaced in the last 13 years is the rose, which tends to split along the welds - but not bad for the use it gets.

Helleborus orientalis still looking fabulous

Our 100 metre long herbaceous borders have drifts of hellebores positioned just behind the hostas flanking both sides of our old stone path. Before these unfurl during spring the hellebores are the highlight of the borders.

They have been flowering for about a month already, but as the 'petals' are not really botanically correct, rather they are sepals - which are far more weather resistant (you can just see in the photo the true petals peeking out from the dark centre around the stamens).

We have a creamy white variety for most of the borders, but in the middle beds a riotous mix of cream, pink, purple and nearly black, all with various spots and streaks.

The white ones do have a certain air of dignity about them - but you really can't beat the mixed colours against a clear blue spring sky.

Sowing seeds and more seeds...

The greenhouse is a frenzy of pots, seedlings, trays and watering cans. This time of year, however big your greenhouse, it always ends up shuffling pots around as they grow and fill their allocated space, seedling get pricked out and use up 10 times their area, and young plants need transferring to our frost free vinery to start hardening off before planting out.

The last few seeds are going in the propagator now, large seeds of the Melons and Cucumbers for training up the metal framework in the vinery - compare these to the tiny grey-white seeds of brachysome, hardly visible when sown. It is always interesting when growing from seed opening the packet of something you have not tried before. The shape, colour and size of different seeds are so varied!

Just remember the rule of thumb for beginners sowing seeds - cover the seed with about the same depth of compost, this way the food reserves can power the seedling to the surface. Too deep and it will run ot of energy before it reaches the surface. The tiniest seeds do not even need covering, just ensure they are kept moist. And there will always be exceptions to this rule as some seeds require light to germinate so if you can always check before you cover them up!

Spring mulch on the borders

We are now well underway with the spring job of mulching our borders. The green waste does an excellent job of covering up those tiny weed seedlings that are just germinating as the April sunshine and showers are providing perfect conditions for them. As they are annuals, they just do not have the root system to cope with an inch of mulch on top of them, so they will die.

Whereas the perennials tolerate the mulch well, as long as you avoid throwing it right on top of their crowns, they look lovely too, the dark colour showing up the fresh green leaves at this time of year.

The job is made a little easier by using our 3-wheeler to transport the mulch as close as we can get it to the borders, and from there it is all shovelled on by hand - this usually brings on the first afternoons wearing t-shirts as its as energetic as it sounds!

Green Waste Mulch

Hey, can you guess what the gardeners will be doing over the next 6 weeks? The clue is in the photo!

We had our delivery of mulch last week, for all the beds in the garden. It is 50 cubic metres of Green Waste, garden clippings collected and recycled from your green wheely bins and local councils garden waste in the dumps, all composted and reused as a mulch and soil improver.

We have been using this for the last 6 years or so, and have never had any problems with weeds, disease or pests appearing. It is wonderful for mulching and we spread a generous layer on all our beds, which look wonderfully neat after this, a rich dark colour.

I shall post a photo of work in progress soon - and yes, it is all shovelled on by hand...

Climbing roses neatly pruned


Our climbing roses in Georges Bed are all neatly pruned around the wooden posts they wind their way around.

By training as close to the horizontal as far as practical, the hormone that promotes growth, Auxin, is more evenly distributed along the stems, rather than rushing straight to the tips as in a vertical stem, therefore encouraging more flowers lower down on the plant.

This year we are planting Clematis viticella cultivars 'Kermisina', 'Niobe', Polish Spirit' and 'Blue Belle' to clamber up the poles alongside the roses, to add extra colour during Summer.

Hardy ferns get the chop!

After a close inspection, our hardy ferns look just about perfect for their annual cutting down. Just look inside all the old leaves, and see if the new little fronds are looking like they are ready to burst into growth.

If you cut off all the old leaves before they start to unfurl it is a much quicker job than when they have started as you must be careful not to damage any of the new growth. We leave all the old leaves on until this stage, as it gives them a little protection against the harsh winter frosts.

Its also a good chance to clear any old leaves, debris and snails that have made their home in the the lovely dry base of the plant before spring arrives.

Onion sets or onion seeds?

Which will be better onions - those grown from seed or from sets?

To settle this dilema, this year we shall be growing one onion from seed (Red Baron) - and one from sets (Snowball). The sets arrived in Feburary and were planted in multi-purpose compost in pots on the 8th, the seeds were sown in March in the heated greenhouse.

So place your bets now....

Dividing dahlia tubers

For the first time last year in our potager, we grew a lovely, dramatic dahlia called 'Chat Noir'.

It is a variety recommended in Sarah Ravens catalogue, grown for its dark red, almost black velvety petals, and a contrasting lime green centre - a truly wonderful cut flower which continued producing flowers right up until our first frost in November.

The perfect job for a wet and windy afternoon in March, I showed Barbara and Debbie how easy it is to divide dahlia tubers for more plants this year. The plants had grown well this last year, and we managed to obtain about 6 tubers divided from the main plant, so by the end of the afternoon 18 new plants were potted up into multi-purpose compost and placed in the vinery to allow them into growth earlier and to keep an eye on them, the three original plants were left a decent size, and replanted into the potager in a different place according to the 2006 design.

A little taster as to what to expect when the flowers burst open again is below...