Mowing grass for the first time

Last week, the weather was perfect to start getting the lawns ready for spring (when it does finally arrive). Although the grass is not growing just yet, it does grow a little over winter, so to neaten it up we cut it very lightly.

Using our John Deere 755, which has a grass collection system, we can effectively hoover up any debris such as leaves and cones from the lawns.

As it has been so windy, the grass was lovely and dry, so out I ventured, wrapped up in several layers to keep warm, and mowed all our lawns. The previous day I had used a pedestrian rotary mower for the same reason on all our smaller lawns.

Its always lovely to smell the grass cutting for the first time of the year. Even with 5 layers and a woolly hat on!

Osteospermum 'Glistening White'


Seed sowing is continuing throughout March, as space becomes available in the heated propagator. This heat is required for germination in some seeds, but the greenhouse is heated so for many seeds, this is warm enough.

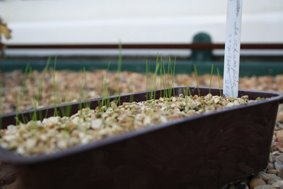
Pictured is Osteospermum 'Glistening White' one seed per module, this was then covered with a very light dusting of compost. Thoroughly watered, the clear propagator top went on, then left on the greenhouse staging to its own devices. Around 10 day later we have over 100 healthy seedlings germinated, no need for the propagator top now, or you risk etiolated seedlings - long, leggy plants reaching up to the light.

PS We have now renamed this variety to 'Gusting White', after Rachael misread the label. A far more interesting name, we thought.

Chimonanthus praecox, or wintersweet

Nestled on the brick wall in the rose garden is a wintersweet, also known as Chimonanthus praecox.

It is in a sheltered spot, and grown as a wall shrub for that little bit of extra warmth throught he coldest months. Once the sun has risen and warm the bloows, a delicious scent is carried on the air, a well chosen common name is wintersweet.

Looking closer, the petals are almost translucent, so delicate they really don't look like they will withstand any frost, but they keep on flowering. This is the first year we have had a really good show on this plant, as they take a while to settle in, but after about 5 years, looks like there is no stopping it now!

Sharon Pearson, Garden Photographer


We had a visit by Sharon Pearson, a talented garden photographer who spent the afternoon with us snapping away. So I couldn't resist taking her photo, of course.

We were very lucky to have one of those bright, crisp winter days, so hopefully the photos Sharon took will be fantastic!

Watch this space!

To see other photos visit her website at www.sharonpearson.co.uk

Coldest winter for a while...

Well, it is now official. The Met. Office has announced it has been the coldest winter since 1996/97. After the last two weeks I can certainly believe it!

Barbaras gloves were left out overnight by mistake, and by the following morning were encrusted with shimmering frost - along with everything else.
We have been waiting for the weather to allow us to prune our pleached lime walk, but hopefully this coming week will be milder, albeit forecast wet for the next week now.

But what else would gardeners moan about, if it weren't for the weather!

Very wet, very cold and very windy

Very wet, very cold and very windy weather last week = Very tidy greenhouse.

Also, no more mealy bug on our citrus trees. Tony spent a morning wiping the leaves our oranges and lemons free of mealy bugs, in the warmth of the greenhouse . These little creatures look nothing more than a tiny speck of cotton wool stuck to the branches or leaves of the oranges, and colonies will increase if not treated.

Low numbers will not really cause any harm to plants, but severe infestations can lead to eventual death of the plant.
Because of the waxy 'cotton wool' covering these pests have, pesticides have a limited effect, so physically removing them with a little soapy water is far more effective.

And at least you escape the worst of the wet, cold and wind.

Pruning our (very large) wisteria

Every February and July we prune the very large wisteria which covers the front of the Manor.

When I say 'we', I really mean the royal 'we' as Tony the gardener is the bravest one of us to clamber up the scaffold tower to carry out this task. (you can spot him in the photo at the top, which shows the scale of the job!)

This time of year it gets a hard prune, back to just 2 or 3 buds from the main framework. At this time of year the buds have started swelling, so they are easy to spot where to cut back to. Any long, whippy growth is also cut back, which may have been missed in the summer prune. The reason why we give it another prune in July is to shorten the whippy growths to about 30cm from the framework to allow more light to the wood, helping the flower buds gather energy for next years show - and what a show!

You will have to wait with anticipation until the photos are taken, but unfortunately you won't be able to appreciate the gorgeous scent wafting on the breeze...

RHS seed list

A couple of weeks ago, the seed of Deschampsia cespitosa was sown in the propagator. The seed was part of the annual order we send to the RHS seed list scheme.

Available to all RHS members, the scheme gives access to unusual seeds collected in the RHS gardens around the UK. For just £10 you receive 20 packets of seed you choose from their comprehensive list, and these are sent out in spring.

Even though the deschampsia are from last years seeds, the germination rate was fantastic, with over 150 tiny little plants now nestled in their own modules to grow on. Not to mention the other 19 packets, it is well worth the money, especially as some of the seed is quite difficult to buy elsewhere! Other unusual little grasses now germinating are Ampelodesmos mauritanus, and Melica ciliata, both little known but sure to turn heads when the are big enough for the garden...

Apple pruning

The annual task of pruning our apple tress in the wild flower meadow has come around again, and it was a case of girl power for the job - three of us all atop the step ladders snipping away.

All our apples were planted in the same year, and they all old varieties with some lovely names like 'Peasgood Nonsuch' and 'Irish Peach'. They were bought from Bernwode nursery near Aylesbury about 1998 (I shall have to check the diary).

Follow some easy rules and it becomes quite simple to prune established apples
  1. Remove any dead or damaged branches
  2. Remove any crossing branches
  3. Remove any spindly laterials
  4. Reduce last years growth (identified by the shiny new wood instead of older grey wood) by at least half, preferably two thirds. Cut to an outward facing bud.

Most of our trees are spur bearing, (the apples grow on 'spurs' along the branches), but some are tip bearing. We treat them pretty much the same, but they are pruned less hard.

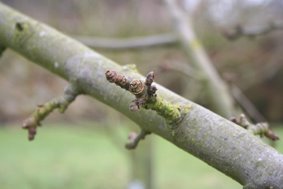
The fruit buds (pictured) are quite clear this time of year, they are much fatter than the leaf buds. You can see the spurs quite clearly too, definitely do not remove these or you won't have any apples this summer!

http://www.bernwodeplants.co.uk/apples.htm

Holy smoke!


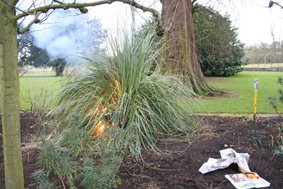
Every two or three years we set fire to our two pampas grasses in the old herbaceous border, and the weather was perfect for this job on friday - very dry for the last couple of weeks, a gentle breeze, and before the grass has started to grow again.

It has a certain amount of naughtiness this job, like you are not really supposed to be setting plants in the borders alight, but if you have ever tried to tackle a large pampas with loppers and shear, believe me it is a lot quicker and easier and you end up with less cuts to your arms! I know there is an opinion that setting pampas grasses alight may damage the crown of the plant, yet in the 12 years we have been practicing this, they have not suffered.

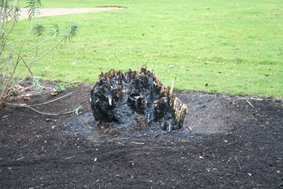
The 'after' photo shows the result, but it will look fine as soon as it starts growing in spring.

Remember to check for hedgehogs before you start though!

Finished Plant Supports

For Daisy, here is a picture of the finished plant supports, in situ in the potager - the colours of the willow really stand out well against the winter frost...

Coral spot spotted


While pruning the roses this week, we noticed some tiny red 'pimples' on some of the dead wood we were pruning out. This is coral spot, a fungus which mainly attacks dead parts of woody plants, but may spread to live wood if not pruned out.

The correct name is Nectria cinnabarina. This lovely name observes the fact that the final colour of the mature pustules (not such a nice word) is cinnibar red.

I often see it, not just on dead wood, but old twiggy plant supports, the trellis obilisks our roses are grown against and wooden fences.

So whenever it is spotted, we prune the branch, to prevent it spreading - and the chances are the branch is already dead.

No frost in the greenhouse!


This week has seen a lot of cold frosty weather. As it has been so dry, from inside it hasn't looked particually cold, as the grass has not been white and crisp, but on Friday the thermometer didn't rise above 0 degrees C at all.

This is always a good time to go into the greenhouse and sow seeds. We had grasses and perennials from the RHS seed distribution scheme, which were sowed in potting compost and covered with perlite. These were watered and placed in the two covered propagating units at either 15 or 20 degrees C depending on the seeds germination requirements. Seeds can be fickle things, and some will germinate within a few days, while others may take up to 6 weeks.

Just before christmas, Rachel and I had sowed seeds which needed stratification (a period of cold to break dormancy), so after sowing we placed them in our coldframes outside to expose them to the cold, of which we have had plenty of nights below freezing. This has already triggered germination in Nepeta parnassica, Sedum aizoon and Hyssopus officinalis. So don't assume every seed needs heat to germinate!

Dismal gardening weather!


Has been one of those dismal winter weeks, with the fog and frost not lifting on some days. Has given us chance to catch up some indoor work, like painting the delphinium supports dark green so they do not show as much as bare metal. Tony got this choice job, and Barbara and Debi spent one morning giving our restored Victorian vinery a good clear out.

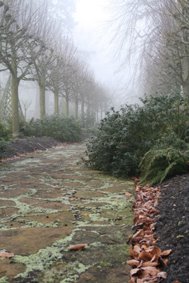
As the photo shows, it is a good month after Christmas, and the leaves are still falling off our Copper beech tree onto the borders. It seems unusually late for them to still be hanging on, even after the cold and windy weather of late, they are only leaving one by one. Keeps the gardeners busy clearing up though!

Wrags trainee gets stuck in with the saw


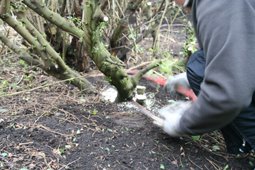
Rachael is our WRAGS (Women Returning to Amenity Gardening Scheme) trainee for this year, and started in October. The scheme is run by the Womens Farm and Garden Association (WFGA). Today she got stuck into removing an old overgrown ceanothus which was smothering a lovely shrub rose near the entrance gate. On a chilly morning its also the quickest way to warm up and start removing the layers we are all bundled up in. Once the bulk had been removed, I am sure you could hear the rose breathe a sigh of relief, as fresh air wound its way around the stems, blowing away the cobwebs (along with any bugs and diseases hanging around).

A new year starts at Toddington


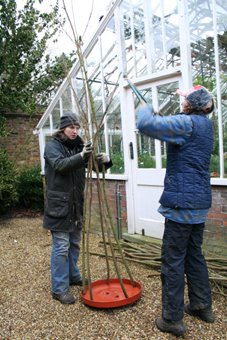
Another year starts in the garden, and on one wet Tuesday afternoon, the gardeners set about remaking the hazel supports for the ornamental veggy, herb and cutflower garden, otherwise known as the potager!


We selected lovely, straight lengths of hazel growing along our nut walk, each about 6 feet long, and colourful stems of cornus and willow. The next part was a four-handed affair of holding the long hazel stems together whilst twining the cornus and willow around to hold it all together.

After trying three horizontal loops of cornus, the consensus was to increase this to five, and the supports were indeed much sturdier as a result. The resulting supports were put in place in the deserted winter potager ready to be smothered in the summer with sweet peas, spaghetti squash and purple pods of mange-tout.

(the attractive looking bin lid at the bottom was to ensure they were all roughly the same size - this was removed before positioning in the potager!)